GIMP BRAIDING PROJECTS
LANYARDS LEASHES BELTS BRACELETS
Copyright, 1940
by
FELLOWCRAFTERS, INC.
Boston, Massachusetts
PRINTED IN THE UNITED STATES OF AMERICA
GIMP BRAIDING PROJECTS
Written and Illustrated by Charles E. White, Jr.
For the convenience of craftsmen, we have assembled in this booklet the directions for many of thepopular gimp projects, with suggestions for a multitude of patterns which can be made with anydesired color combination. These directions have been completely illustrated in color, so that everystep can readily be understood, since the true simplicity of braiding has often been obscured by complicatedinstructions and illustrations.
The material itself is a special coated tape made in various colors and shapes. Standard gimp andTitan lacing are flat and 3/32″ wide. The special ¼″ wide gimp also is flat. Round or cord gimpis available in either 3/64″ or 5/64″ diameters. These various types of gimp can be purchased bythe yard, though they are much less expensive when secured by the spool. Leather lacings may beused in place of gimp where particular effects are desired.
General Directions
Standard and wide gimps have a seam on one face. Always start braiding with this seam next to thecore and be careful at the edge of the braid to fold each strand so that the seam remains inside or onthe back of the work. Titan lacing is seamless, and therefore can be used with either surface on theoutside of the braid. A well-made article, however, should have no twisted strands, whether madeof standard gimp, or of seamless Titan lacing.
In all work with gimp it is essential to keep all the strands pulled tight, and to adjust every row ofstitches, in order to ensure that the braid will be uniform.
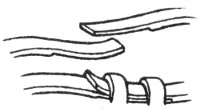
Long working strands may be tied in coils to keep them from snarling. If it is necessary to splice astrand, slice away half the thickness of the gimp on both of the ends to be joined. Overlap the twoends and lead them through several stitches, then trim off the extra material. (Fig. 1.) If it isnecessary to set the braid aside before it is finished, use ordinary paper clips or knot the strands tokeep them in place.
Steel Bracelet Cores
The type of core most widely used for bracelet making is formed from a strip of spring steel either½″ or ¼″ wide. Make a narrow V-shaped slit half the width of the band at about ½″ from oneend. (Fig. 2A.) Mark off beyond this cut the circumference of your bracelet (usually 8-9 inches)and make another slit half way through from the opposite side. Clip off the metal about ½″ beyondthis second slit. Connect the band as shown, with the ends on the inside of the bracelet.(Figs. 3 and 4.) Set the band on a solid surface and pound with a mallet or hammer until the edgesfit smoothly.

Fig. 1

Fig. 2